IoT Dashboard for Smart Building
This project is to help visualize sensors in a smart building as a dashboard application. It was built a Project thesis and part of the SENSE Project.
- The live demo of the application can be found here.
- The full documentation of the application can be found here.
- The link to the repository is found here.
Table of contents
- Technologies
- Setup
- Available Scripts
- Application Architecture
- The Dashboard
- Things
- Custom Hooks
- Time Series
- Routing
- Drawing on the canvas
- I18n
Technologies
The following technologies among others were the used mostly to achieve this project.
- React
- Redux
- Bootstrap
- Javascript
Setup
To run this project, install it locally using npm:
$ cd <project directory>
$ npm install
$ npm start
Available Scripts
In the project directory, you can run:
npm install
This helps install all the dependencies in the package.json file. This should be done in any fresh download or clone of this repository. Ensure you have NodeJS installed to be able to run this.
npm start
Runs the app in the development mode.
Open http://localhost:3000 to view it in the browser.
The page will reload if you make edits.
You will also see any lint errors in the console.
npm run build
Builds the app for production to the build folder.
It correctly bundles React in production mode and optimizes the build for the best performance.
The build is minified and the filenames include the hashes.
Your app is ready to be deployed!
See the section about deployment for more information.
npm run docs
Builds the documentation of the project which can be accessed in the generated docs subfolder.
Application Architecture
The React application uses a Redux store to hold global application state like the language selected and other global information. The application is itself holds an internationalization framework for changing between the selected languages. Since React is a single-page application, a routing framework is also held within the internationalization framework to help in creating paths to different pages of the application. Each page is then displayed based on the route selected.

There are a few pages created to serve different purposes in the application. Each of those pages are React components themselves and appear as a stand-alone page due to the routing functions provided by the React-router library.
Other pages maybe added later in the future.
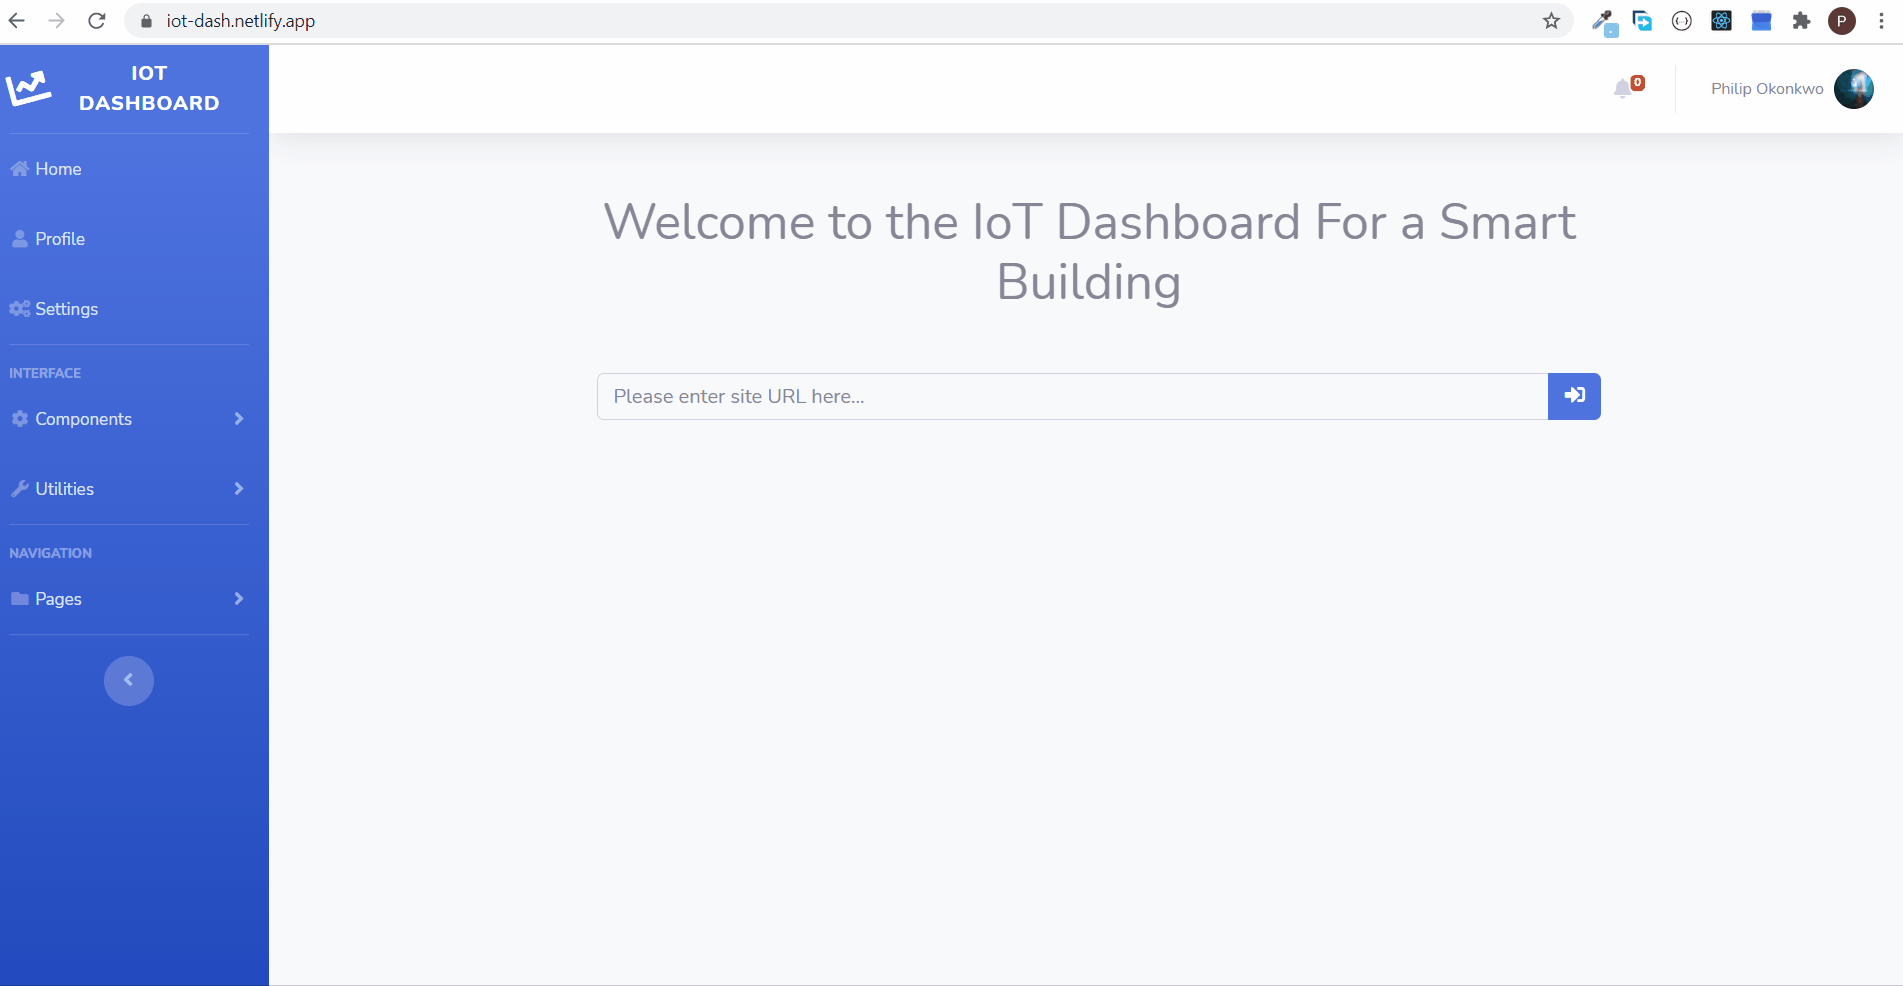
The Dashboard
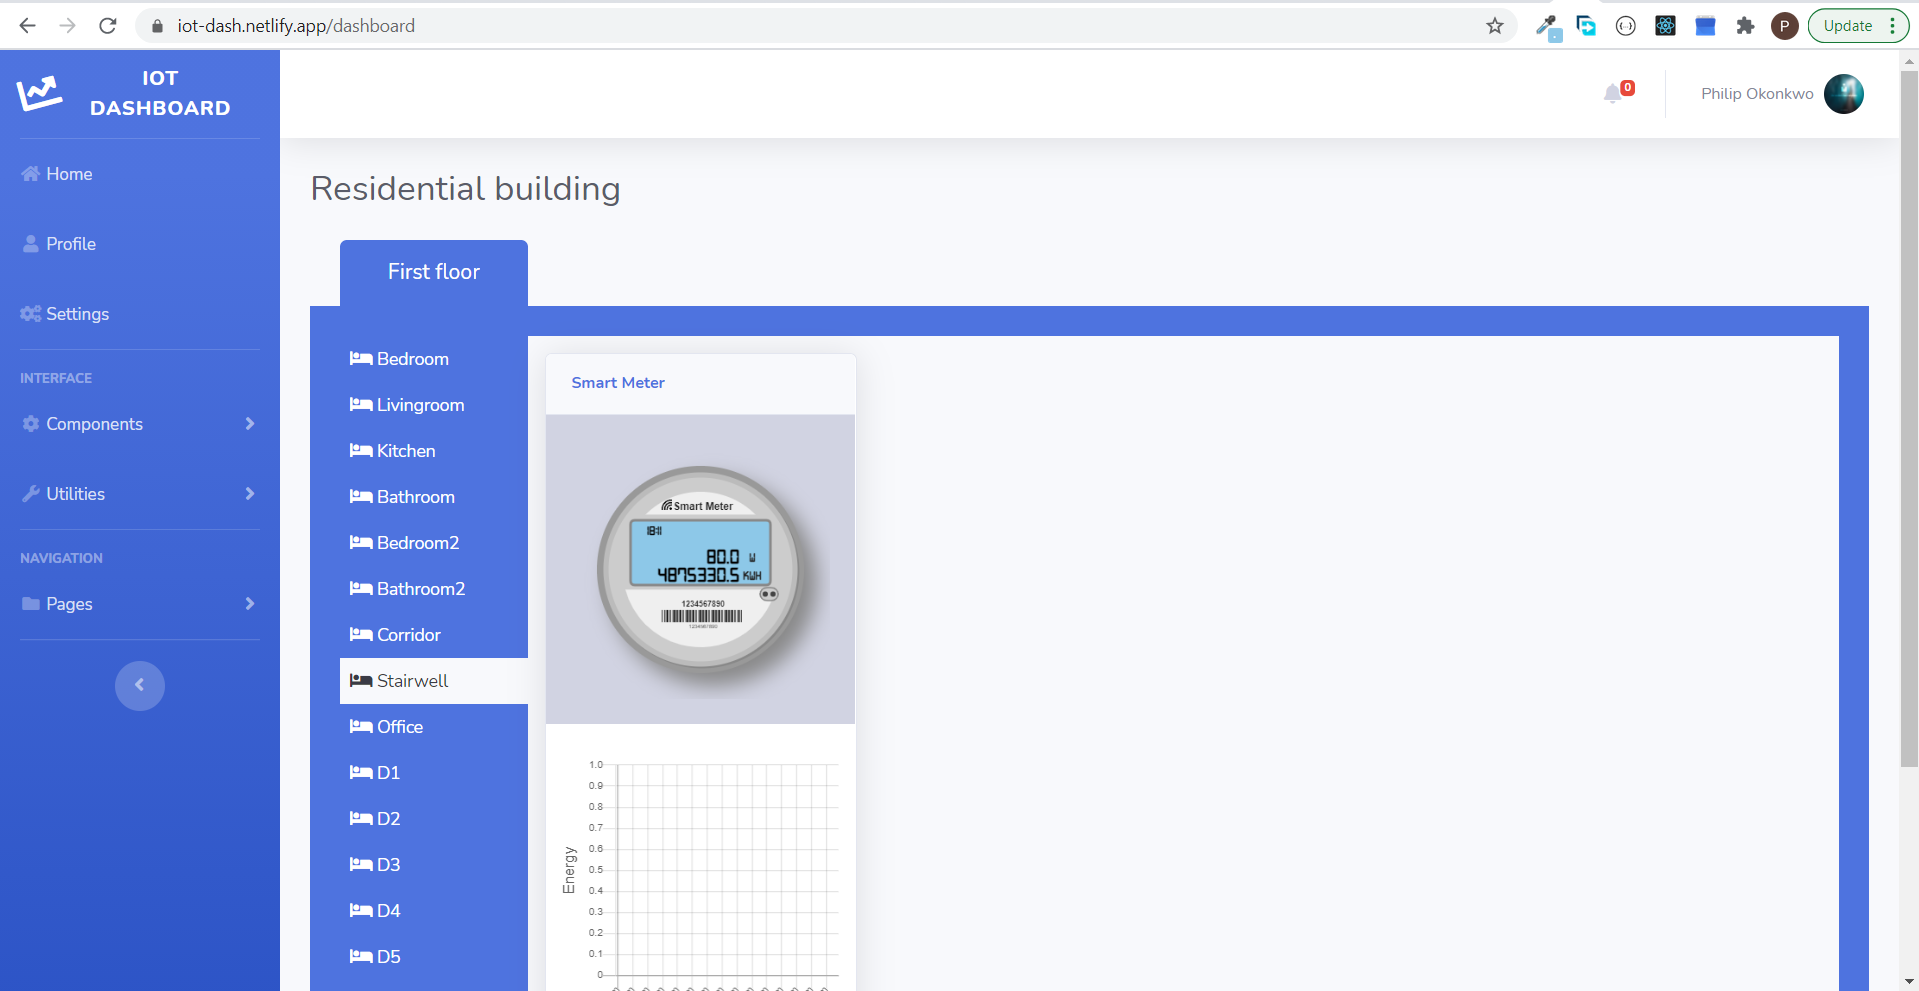
This is the main focus of the application. The dashboard shows information about a particular building whose URL was submitted in the Home page of the application.
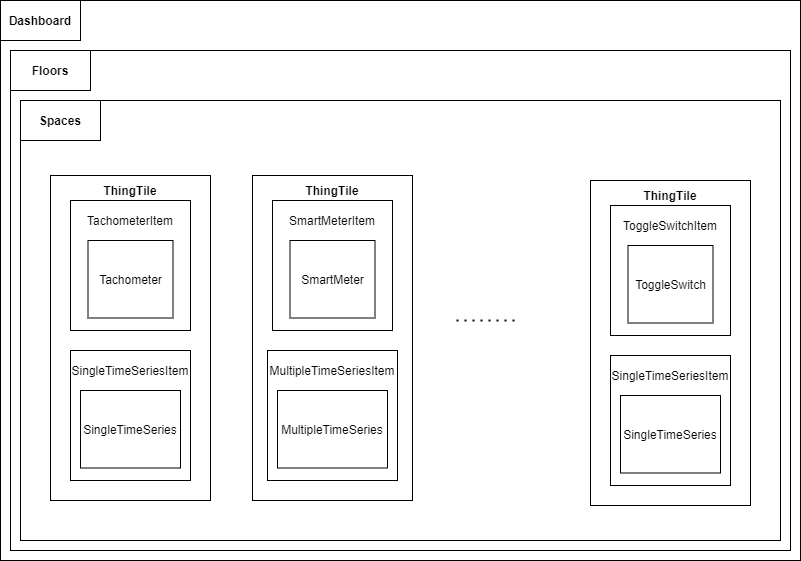
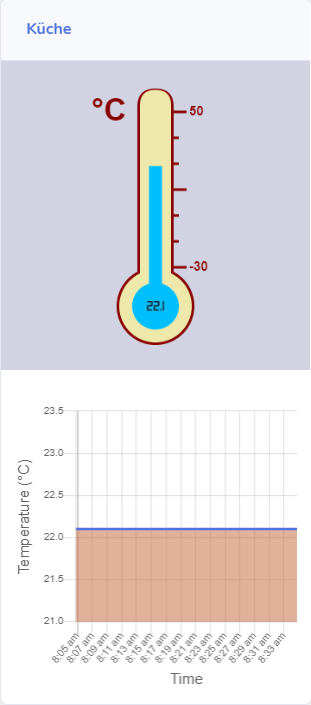
Visually the application is organized so that the floors and spaces are tabs. Each tab can be selected so that only the contents for that tab is viewable at that moment. In the figure below, there is only just one tab for the floors and that tab is used by default because the building has only one storey. Each sensor is represented by a ThingTile which not only shows the sensor current values but also a timeseries graph for the past values of the sensor for a preselected time interval.
There are a lot of components created to help in displaying information within the dashboard. This includes components that represents floors and rooms as well as components for holding and making calls to fetch actual device data and display them. The components are listed below:
- Floor.
- Space.
- ThingTile.
- ToggleSwitchItem.
- ThermometerItem.
- EnergyMeterItem.
- TachometerItem.
- ShutterItem.
- SmartMeterItem.
- CompositeMeterItem.
- SingleTimeSeriesItem.
- MultipleTimeSeriesItem.
- LoadingItem.
- ErrorItem.
Things
Since the backend of this application used the Web of Things architecture, each sensor in the API is represented as a Thing and has its own Thing Description. In the dashboard, each Thing category is even its own visual representation.
Thermometer
These are single-property Things just used to measure the temperature in the environment. In the application, temperature sensors are represented as a thermometer. In the source code, the React component that represents this device is called a Thermometer.
Power Meter
These are all the single-property Things that measure just the power values in the application. This include the ones that measure the powers on one phase or all three phases as well as any device. In the application power sensor are represented as a tachometer. In the source code, the React component that represents this device is called a Tachometer.

Energy Meter
These are single-property Things which display the energy values in the dashboard application. The energy value unit is in Watt-hours (Wh). In the application, energy sensors or meters are represented as an energy meter. In the source code, the React component used to represent energy devices is the EnergyMeter.

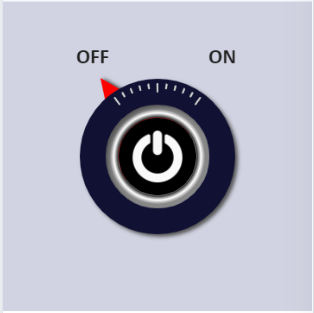
Toggle Switch
These are just single-property Things that have two states and toggle between those states. The states can either be true or false. In the application switches are depicted as a toggle switch. In the source code the React component created to represent this is called a ToggleSwitch.
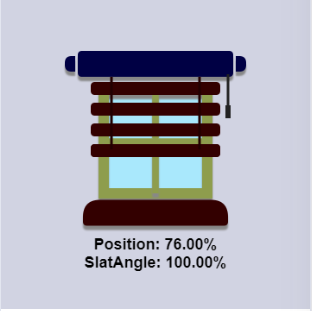
Shutter
These are multiple-property Things which display the position and slat angle of a window shutter. The React component used to represent them in the source code is the Shutter.
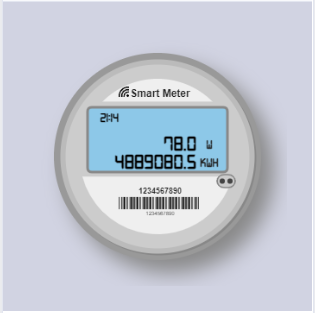
Smart Meter
This is a multiple-property Things which reads the power and energy at the same time. It is represented in the application as a round smart meter. In the source code the component that represents it is the SmartMeter.
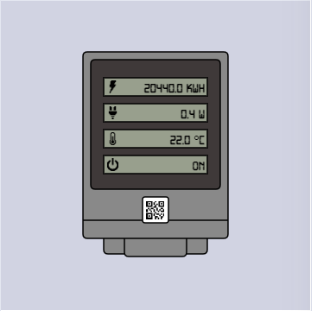
Composite Meter
This is also a multiple-property Things that can provide the temperature, power, energy and switch state at the same time. In the application they are represented as a display unit that shows the four values. In the source code the component that represent such sensor is called the CompositeMeter.
Custom Hooks
There are a few React custom hooks created mostly to reduce code repetition and make the code cleaner. These hooks perform different functions like animation, storage, network calls etc.
Time Series
Each Thing element in the API has an endpoint that retrieves the history of values of that element or Thing. These values are usually given as a JSON array with the time each value was stored and the value at that particular time. The figure below shows a ThingTile holding a thermometer and its singletimeseries component.
There are two kinds of time series components created for this application.
-
SingleTimeSeries: This is a component used to display a time series graph of the history of values for the single-property items. It is shown with the time values on the x-axis and the specific property of the device on the y-axis. The time interval is usually a preselected value of 1 hour, 1 minute or 1 day depending on the volume of historical data store for that particular device.
-
MultipleTimeSeries: This is a component used to display a time series graph of the history of values for the multiple-property items. It relies on SingleTimeSeries to display the time series of each property measured by the sensor. And it uses the useInterval hook to switch the display among each time series at regular time intervals.
Routing
Routing is achieved through the use of the React-Router library since URL routing is not supported in React itself. Routing allows us to use the single page application as if it is made of multiple different pages with each page being fetched when the link to them is clicked. The code belows shows part of how routing is achieved in the application. Each page component is placed within a Route component which comes from React Router. The Route component specifies the path to the page. And Switch component wraps the routes and helps to only show the specific path of concern.
function App() {
  return (
    <Router>
      ...
      <Switch>
        <Route exact path='/dashboard'>
          <DashboardPage />
        </Route>
        <Route exact path='/profile'>
          <ProfilePage />
        </Route>
        <Route exact path='/settings'>
          <SettingsPage />
        </Route>
        <Route exact path='/single-chart'>
          <SingleChartPage />
        </Route>
        <Route exact path='/chart'>
          <MultiChartPage />
        </Route>
        <Route exact path='/'>
          <HomePage />
        </Route>
        <Route exact path='*'>
          <ErrorPage />
        </Route>
      </Switch>
      ...
    </Router>
  )
}

export default App
Two kinds of routing are done in this application. The first one is routing by using the navigation links to a specific page provided and the second is routing by sending information from one page to another. For this kinds of routing, declaring them like above within a route is enough.
The second type of routing is used to send information from the HomePage to the Dashboard page or to send to send information about a specific time series from the TimeSeries page of the SingleChartPage. For this kind of routing, it is not enough to just declare them. React-Router provides its own custom hooks for dealing with such a case. The code below shows how data is sent from the HomePage to the DashboardPage.
const HomePage = () => {
    const { t, } = useTranslation();
    const history = useHistory();
    const inputRef = useRef(null);

    const onSubmit = (event) => {
        event.preventDefault();
        history.push({
            pathname: '/dashboard',
            state: { url: inputRef.current.value }
        });
    }
    return (
        // Component code.
    )
}
React-Router provides the useHistory custom hook which is used to push the value of the URL submitted into the Hompage form to the DashboardPage. The pathname property in the use history hook represents the path to the DashboardPage. The state property holds the value to be sent from the receiving page. The value for the state is an object with a key called url which helps to identify and retrieve it in the DashboardPage.
const DashboardPage = () => {
  const [url, setUrl] = useState('')
  const location = useLocation()
  const history = useHistory()

  useEffect(() => {
    if (location.state === undefined) {
      history.push('/error')
    } else {
      setUrl(location.state.url)
    }
  }, [location, url, history])

  // Render component body
}
The code above shows how the URL is retrieved in the DashboardPage to be used in creating the dashboard. React-router also supplies the useLocation which is used to retrieve the value using the url property sent in the HomePage.
Drawing on the canvas
It was necessary to split each sensor component into different layers to help in handling the different HTML canvas optimization concerns listed below.
- Using multiple layered canvases for complex scenes.
- Batching canvas calls together. One of such an example will be to draw a polyline instead of multiple separate lines.
- Rendering screen differences only, not the whole new state.
- When animating, one should prefer window.requestAnimationFrame() instead of window.setInterval().
A good example for illustration is the Tachometer component because it has 3 layered subcomponents. The code block below shows the JSX excerpt from the Tachometer component with the 3 layered subcomponents shown clearly. The 3 layers are the TachometerFace, TachometerIndicatorContainer and TachometerCenter respectively.
const Tachometer = ({ value }) => {
  // let the tachometer animate from -5 on initial start
  const [previous, setPrevious] = useState(-5)
  const previousValue = usePrevious(previous)

  useEffect(() => {
    setPrevious(value)
  }, [value])

  return (
    <div className='guage'>
      <TachometerFace />
      <TachometerIndicatorContainer
        value={value}
        previousValue={previousValue}
      />
      <TachometerCenter />
    </div>
  )
}
The figure below shows all the layers of the Tachometer visually separated with the TachometerFace on the left, TachometerIndicatorContainer in the middle and TachometerCenter on the right.
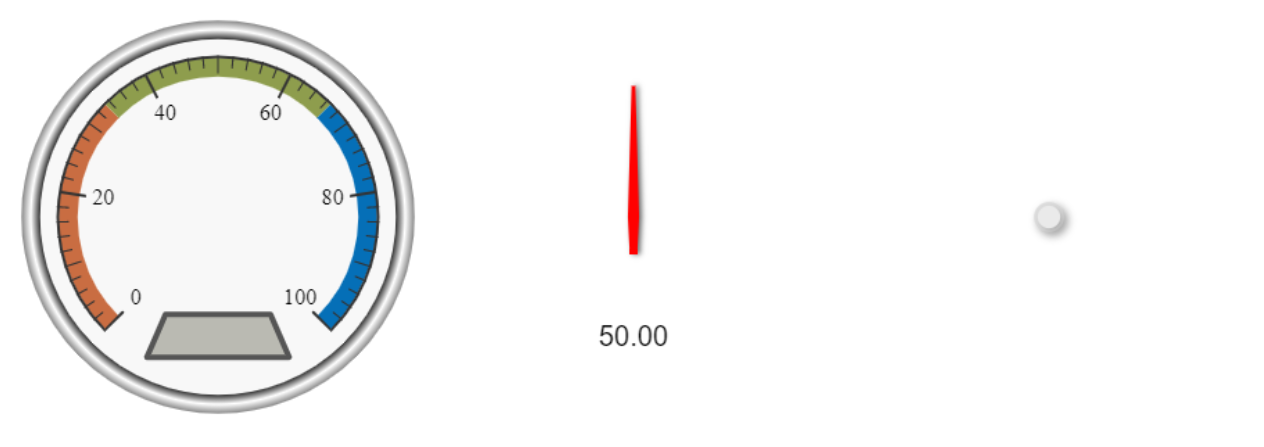
Figure 4.12 shows what the same layers look like when combined to make up the whole Tachometer.
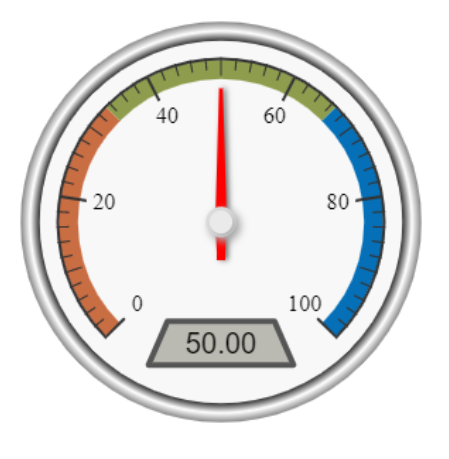
All the animations are done within the TachometerIndicatorContainer since it holds the values capable of changing in the Tachometer component. This ensures that whenever a new value is received, the TachometerFace and TachometerCenter are not re-rendered only the TachometerIndicatorContainer is thereby making sure the whole state is not always rendered just the screen difference. The useAnimation hook is used within the TachometerIndicatorContainer component. Since it depends on the useAnimationTimer hook which uses requestAnimationFrame function in its implementation, that is another optimization recommendation strictly adhered to.
Internationalization
Multiple language support was achieved using React-i18next which is a framework for implementing internationalization in React applications. It has its own custom hooks for achieving translation between predefined languages and only one of those custom hooks is used in this application.
To be able to use React-i18next, first a file called i18next.js is created inside the source folder. The file specifies the language options for the application and the default or fallback language. The fallbackLng property specifies the default language and is used if there is no translation found for a particular word. The code block below shows some content in the i18next.js file. Here the English version will be used as the default.
export const languageOptions = ['English', 'Deutsch']

export default i18n
  .use(Backend)
  .use(LanguageDetector)
  .use(initReactI18next)
  .init({
    fallbackLng: 'English',
    debug: true,
    whitelist: languageOptions,
    interpolation: {
      escapeValue: false,
    },
  })
A folder called locales is created within the public folder of the application and within it, two folder named English and Deutsch are created to exactly match the names of the languages in the code block above. Within each language folder, a translation.json file is created. All the translation files use the same keys but different values corresponding the meaning of a word or sentence in a particular language.
The code block below shows how translation is achieved within the LoadingItem component. The useTranslation hook is used to retrieve the value corresponding to the key called loading in the translation files.
const LoadingItem = ({ url }) => {
  const { t } = useTranslation()

  return (
    <div className='card-body'>
      <div className='loading' title={`${url}`}>
        <div className='loadingcontainer' style={{ fontSize: '18px' }}>
          {t('loading')}... {url}
        </div>
      </div>
    </div>
  )
}
The ability to select languages is achieved within the SettingsPage. The GeneralSettings in the SettingsPage component uses React-Redux to dispatch information about the selected language to the Redux store that holds the global application state. This forces a re-render of the whole application applcation using the appropriate translation file.
Adding new words
To add a new word that will be translated:
- Open the
locales/English/translation.jsonfile in thepublicfolder and add a new key and value pair which corresponds to the words or sentence that should be translated. - Open each other language folder in the
localesfolder and also add the translation of the same words using the same key used for the English version but with a value that corresponds to the translation of those words in the particular language.
Adding New Languages
To add a new language:
- Open the
i18next.jsfile in thesrcfolder. Add the name of the new languge to the LanguageOptions variable. - Open the
public/localesfolder and create a new folder named the same way as the name of the language added in the step above. - Open the newly created folder and add a file called
translation.json. In the the new json file created, add translations for each of the words in theEnglish/translation.jsfile using the same keys as that in the English translation but with different values corresponding to the language translation of the English word values.
Learn More
- To learn React, check out the React documentation.
- To learn Redux, check out the Redux Website.
- To learn React-i18next see the website.
- To learn about React-Router and how it can be used for making a single page application act like it has multiple pages see the website.